Monday, August 14, 2017

Top 5 Dollarama Finds Teacher Finds + Flair Pen FREEBIE

Dollarama is my go-to place for inexpensive cards, decorations and glitter.  It is the last place I would think of to purchase quality school supplies for my classroom...until now.  Check out the loot I found at my local store this August.  If you are lucky, yours might stock the same goodies!
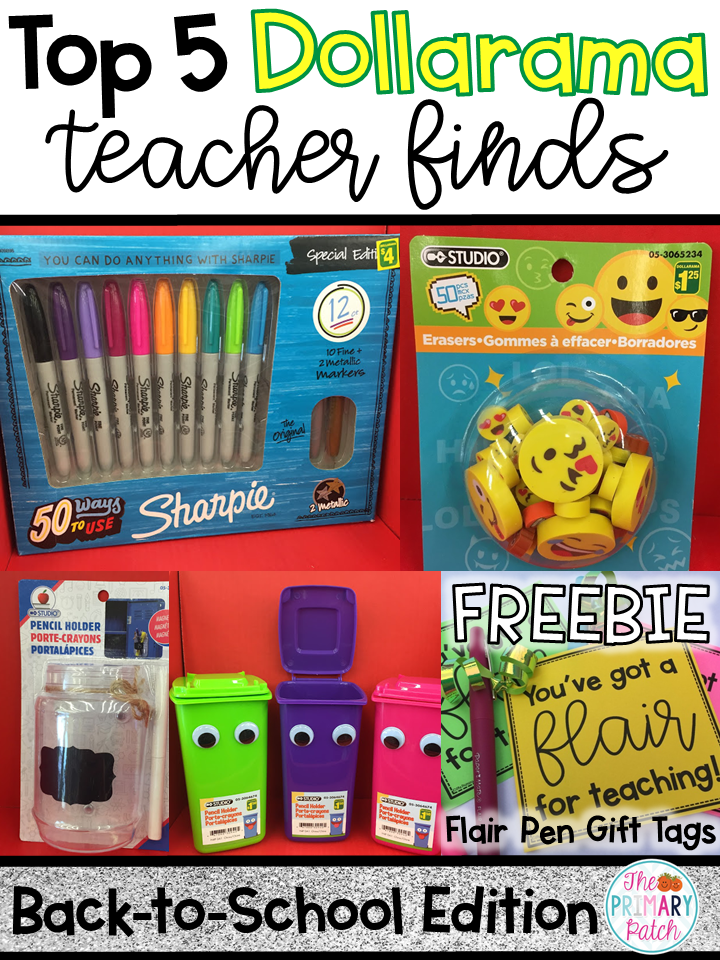
  Here are my Top 5 Finds for Teachers that you can snag for $4 each or less, and a quick and easy back-to-school gift for your staff/teacher besties because #flairpensbringjoy ;-)
NUMBER 5: Ten Special Edition Sharpie Markers (bonus: 2 metallic ones)
COST: $4.00
I use these guys on planners, name tags, book bags, posters, folders, etc. Like the slogan says above the box, "YOU CAN DO ANYTHING WITH SHARPIE."  Teacher tip: if you want to remove Sharpie from a hard surface, use nail polish remover.
NUMBER 4: Chalkboard/Farmhouse Theme Magnetic Pencil Holder
COST: $2.50
I instantly fell in love with these and think they would be perfect to add to a chalk and/or white board.  Use them to store pencils, crayons, name tags, or white board markers where your students can (or can't!) reach them.
NUMBER 3: Googly Eyed Garbage Can Pencil Holders (with lids)
COST: $1.50
Are these the cutest things or what?  I love how they have attached lids as well.  I'm going to bring these out at the Guided Reading table and have one on hand stocked with supplies for any students that are going to work in the resource room or with a volunteer.
NUMBER 2: Emoji Erasers
COST: $1.25
Although you can't see them, there are poop erasers in this package, too. With a class full of boys this upcoming year, I'm guaranteed a few laughs as well as engagement when I pull these out.
NUMBER 1: Twelve Paper Mate Flair Pens
COST: $4.00
I spend an insane amount on Flair Pens each year at Target when I cross-border shop but now all I have to do is hop on over to Dollarama for these beauties.  They are the BEST pens EVER!  I grew up watching my Geography teaching Dad use them to mark and would often swipe them from his desk to use for myself.
Which got me thinking...if I love them so much then I bet my friends at school will as well.  And for less than $15, I can treat my entire staff to a Flair Pen as a back-to-school gift.  Every one loves finding a gift in their staff mailbox, right?
If you'd like to spread some joy and surprise your teacher BFFs, EAs, Admin or Support Staff at your school this September, grab this FREEBIE from my TPT store and get the special coloured paper out you've been saving for a special occassion.  Yep, we all do it ;-)

What's YOUR favourite Dollarama find?  I'd love to know.

Happy back-to-school time!

Sunday, February 26, 2017

Blue Spruce 2017: "Sometimes I Feel Like A Fox" Multimedia Art Project and Writing FREEBIES

It's almost Spring, which means students across Canada are listening to 2017's Forest of Reading book nominees.  As teachers know, new books in the classroom equal increased student engagement.  Bonus points from teachers if the books are Canadian, eh.      I look forward to discovering the ten Blue Spruce titles each year with my second graders.  After I read each one, we fill out a reading response booklet found in my Media Literacy unit below and vote on how much we enjoyed each title on chart paper in our classroom.  Once every class has read all the books, our school votes on our favourite one in the library. When the librarian announces the results over the PA system at the end of the day, screams and gasps can be heard throughout the Primary wing.This year's Blue Spruce selection is outstanding.  My class has only read one title so far called Sometimes I Feel Like A Fox by Danielle Daniel.  You can read about it here:
"In this introduction to the Anishinaabe tradition of totem animals, young children explain why they identify with different creatures such as a deer, beaver or moose. Delightful illustrations show the children wearing masks representing their chosen animal, while the few lines of text on each page work as a series of simple poems throughout the book.  In a brief author’s note, Danielle Daniel explains the importance of totem animals in Anishinaabe culture and how they can also act as animal guides for young children seeking to understand themselves and others."
My students were mesmerized by the idea that children in the Anishinaabe culture have a totem animal and that each animal has such distinct character traits, just like them!  It didn't take my students long to figure out what animal they identified with and that is when I came up with the multimedia art project and corresponding writing activities.  Danielle Daniel's incredible art work immediately spoke to me and I wanted to think of how I could adapt her ideas to something my students could have success with.  I decided that if I took a square picture on my iPhone of each student using my white board as a background, and then uploaded the pictures and printed them, my students could add the animal that they associate with over top of their pictures.  
I spoke about the author's book dedication as well and briefly introduced my students to Residential Schools.  As some of you know, my late uncle Larry sadly experienced the horror of them.  He has written some beautiful books that I encourage you to seek out.
Although it was very hard for me to do, I managed to NOT give my opinion on which animal I thought each student was.  I did, however, try to give a lot of examples for each animal by saying things like, "If you love to spend time with your family, feel happiest when you are with them, and are very protective of your siblings at school, then you might identify as a wolf."
Without further ado, here are the instructions for the easy (but slightly time consuming) multimedia art project.  It's part Health Curriculum, part Art, part Social Studies and part Literacy all wrapped up into one.  So basically, you can't go wrong :-).  If you try this out with your class, please let me know as I would love to see your versions!

Animal Multimedia Art

Step One: Print up both activity sheets found on the publisher's website and distribute a copy for each student.  Instruct students to cut out all of the animals as well as all of the descriptions. 
Step Two: Fold a legal sized paper into 8 sections.  Cut the heading "What Totem Animal Are you?" and glue it to the top of the page.  Then, glue one animal in the left hand corner of each section.  The order isn't important but if a student glues the image in the middle and not to the far left, there won't be enough space for the corresponding description beside it.  
Step Three: Reread the story to the class and discuss which totem animal's description best fits each picture and then glue it beside.  I projected the 2nd activity sheet on my white board for this and wrote down each animal's name to help speed things up (please ignore my very messing printing)!
Step Four: Give students time to reflect and discuss with each other about what animal they identify with the most.  Once they have made their decision, ask them to decide what position they would like their picture to be taken in.  The images in the book inspired my students but I told them it was up to them to come up with a pose. Some of them really blew me away with their artistic interpretations, especially my one student that wanted to be perched on the ledge of a cliff howling at the moon.  We did that by having him kneel on a desk and look upward.  

Step Five: Set up your "studio" and invite students over for their photo shoot.  If you use this terminology, I guarantee your students will be as good as gold waiting their turn.  My studio consisted of a very clean white board, a stool, a chair and a desk.  I asked my models to show me the pose they were thinking of and then we practiced quickly.  Most students stood on the stool but some needed to stand up on the desk as they were not tall enough for me to get a good shot.  I showed my students the pictures I took and asked for feedback by saying  "Which shot do you prefer...number one or number two?" Each picture took about 3-5 minutes.    
Step Six: Print up the images and hand them out.  Instruct students to transform their picture into their totem animal using markers and crayons.
Step Seven (optional): Use an accompanying writing/poetry page and once finished, post it beside the artwork on a bulletin board.  I created acrostic poem pages for animal names that had 3-9 letters in them.  Although I was all set on doing acrostic poetry, I soon realized that my students were ready for a descriptive paragraph instead.  As you can see, the results speak for themselves.  
If you don't have access to this book, I found a link on YouTube for it:

All the best and please let me know how your projects turn out!